For a Video Tutorial on this Topic, see Adding a Limited Warranty to a Deal.
Overview
This tutorial explains how to add a limited warranty to a deal in CareGARDWarranty.com (CGW).
Some dealers provide limited warranties at zero cost to customers when they purchase vehicles from their dealership. The items covered by a limited warranty will vary by several different conditions. For details on coverage offered by your dealership, refer to your product provider.
Getting Started
To add a lifetime warranty to a deal, you must first create a new deal. For more information on deals, see these tutorials:
- Deals > New Deals
- Deals > Pending Deals
- Deals > Recent/Unpaid Deals
- Select Deals > New Deal from the left navigation menu.
- Select the New Deal quick button at the top of the Dashboard.

Starting a New Deal
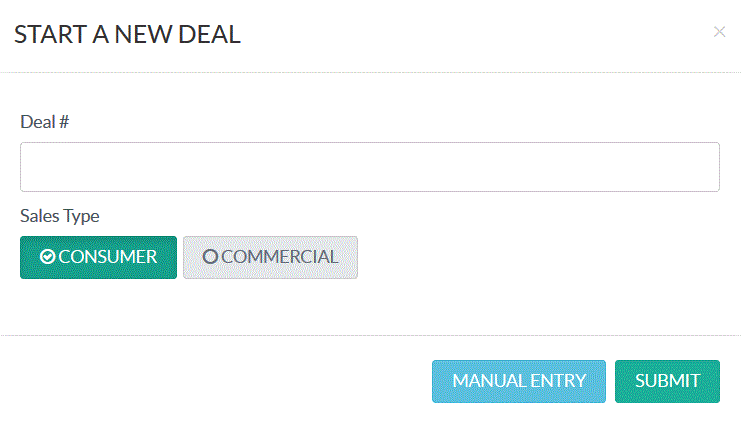
2. In the Start a New Deal dialog, you will begin the process of creating a new deal:
| Item | Description |
| Deal # | Enter the deal number. This is the number the dealership uses to track the deal internally. |
| DMS Producer # | Enter the Dealer Management System (DMS) producer number. DMS examples include Reynolds & Reynolds and Dealertrack Technologies. This will allow you to pull in your DMS information for this deal, rather than entering the information manually in CGW. |
| Sales Type | Select the sales type. Your choices are Consumer or Commercial. |
| Manual Entry | If you are unable to pull in information from the DMS, click this button to manually enter Vehicle, Customer, and Deal information in the New Deal Entry dialog. Note: For the purposes of this tutorial, click the Manual Entry button. |
| Submit | If you are pulling DMS information, click this button to run the DMS pull. If successful, the New Deal Entry dialog will be populated with Vehicle, Customer, and Deal information. |

3. The New Deal Entry dialog contains three panels:
| Item | Description |
| The Vehicle | Allows you to enter details relating to the vehicle |
| The Customer | Allows you to enter details relating to the customer |
| The Deal | Allows you to enter details relating to the deal |
Note: Using the PullDMS button in the top-right corner of the New Deal Entry dialog, you can pull in information from a Dealer Management System (DMS) if your dealership uses one. For the purposes of this tutorial, we will enter information manually instead.
The Vehicle
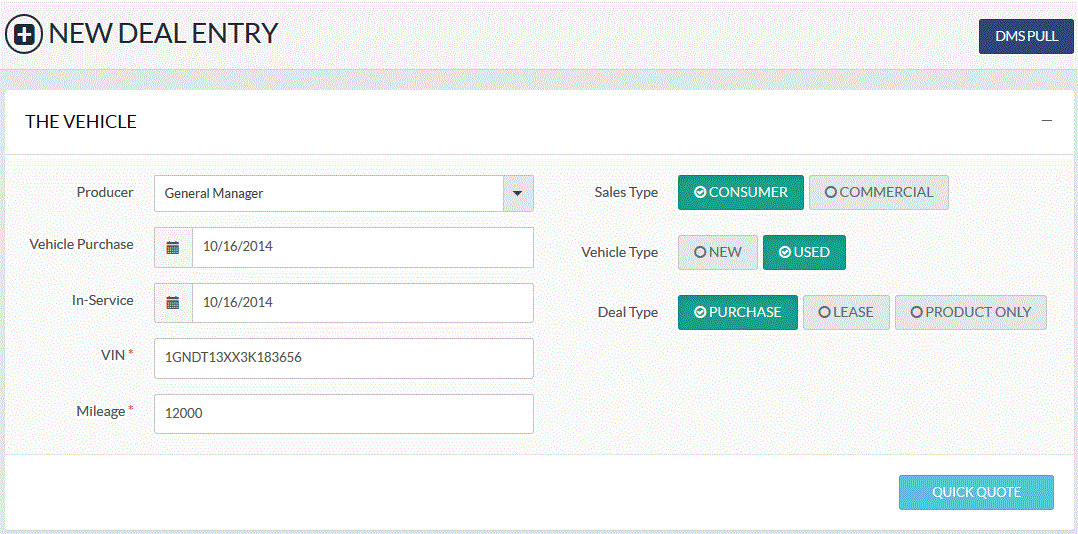
In this panel, you enter details about the vehicle that is part of your deal. Not all fields are required in this panel, but you will have to enter all of the information before finalizing the deal. We recommend taking the time to fill everything out at this time.
| Item | Description | Required |
| Producer | This is you. Your administrator should have set you up in the system as a producer. | No |
| Vehicle Purchase | The date of vehicle purchase | No |
| In-Service | The date when the original car warranty started on the vehicle when it was first purchased as a new vehicle | No |
| VIN | The vehicle’s Vehicle Identification Number | Yes |
| Mileage | The vehicle’s mileage | Yes |
| Sales Type | Select the sales type. Your choices are: · Consumer · Commercial |
No |
| Vehicle Type | Select the vehicle type. Your choices are: · New · Used |
No |
| Deal Type | Select the deal type. Your choices are: · Purchase · Lease · Product Only |
No |

The Vehicle
The Customer
In this panel, you enter customer-related details. Not all fields are required in this panel, but you will have to enter all of the information before finalizing the deal. We recommend taking the time to fill everything out at this time.
| Item | Description | Required |
| First Name | Customer first name | Yes |
| Last Name | Customer last name | Yes |
| Customer email address | No | |
| Daytime Phone | Customer daytime phone number | No |
| Evening Phone | Customer evening phone number | No |
| Cell Phone | Customer cell phone number | No |
| Address and Address 2 |
Customer street or mailing address | Yes |
| City | Customer city | Yes |
| State | Customer state | Yes |
| Zip | Customer zip code | Yes |
| County | Customer county of residence | No |
| Add Co-Buyer | Select this to add a co-buyer for this vehicle | No |

The Deal
In this panel, you enter details about the deal. Not all fields are required in this panel, but you will have to enter all of the information before finalizing the deal. We recommend taking the time to fill everything out at this time.
| Item | Description | Required |
| Deal # | The number your dealership uses to track this deal | No |
| Stock # | The number your dealership uses to track this vehicle | No |
| MSRP | Manufacturer’s Suggested Retail Price | No |
| Fixed Reserves | The fee that the lender pays to the dealer. A fixed reserve is a straight dollar amount fee. An example would be that the lender pays the dealer $500 for every loan the dealer does with them. | No |
| Salesperson | Salesperson making the deal | No |
| Sales Manager | Sales manager in charge of the deal | No |
| Contract Purchased | Date of the sales contract | No |
| Sales Price | Sales price of the vehicle | Yes |
| Net Price | Price of vehicle before taxes and fees | No |
| Rebates | Amount of sales rebates | No |
| Tax/Title/Lic | Amount of tax, title, and license on vehicle | No |
| Lender | Select a lender for this deal or click + icon to add a new lender. If the customer is paying cash for the vehicle, select the None (Cash) option in this menu. | Yes |
| Down Payment | Amount the customer is paying today on the vehicle | No |
| Doc Fees | Amount of dealership fees added to the purchase price | No |
| Net Trade (1) Net Trade (2) |
Amount of the customer’s trade-in vehicle. Two fields are provided in case the customer trades in two vehicles. | No |
| Other | Miscellaneous charges | No |
| Total | This is auto-populated based on previous entries. | N/A |
| Term | The financing term in months. For example, 60 months for a five-year financing period. Two fields are provided in case there are two loans on this deal. | Yes |
| APR | Annual Percentage Rate. Two fields are provided in case there are two loans on this deal. | No |
| Buy | The Buy Rate. This is the interest rate the lender charges the dealer for a loan. The dealer can then sell the loan to the customer for the same or a higher rate. This rate is called the Contract Rate. The lender pays the dealer a fee based on the difference of the two rates. For example, the lenders buy rate to the dealer is 10%. The dealer then charges the customer 12% (the Contract Rate) for the loan. When the loan is funded to the dealer the lender will pay an additional fee amount based on the 2%. Two fields are provided in case there are two loans on this deal. |
No |

The Deal
Note: Depending on the way your dealership is set up, you might encounter the Lifetime Powertrain Warranty dialog at this point. If so, please see the "Adding a Wrap Contract to a Deal" tutorial for more information.
Selecting an F&I Product
At this point in the process, you will use the Create a Menu dialog to select a product package for your customer and edit product package options:
1. After you have entered all of your customer, vehicle, and deal information, click the Continue button at the bottom of the New Deal Entry dialog.
2. The Create a Menu dialog appears, where you can select and edit F&I product packages, such as Platinum, Gold, Silver, or Custom, for your customer. When you make changes to these packages, the total costs are updated.
3. To select a product package, click the check box next to the desired product package:

4. To edit an F&I product in the selected product package, click Edit to the right of that line item. This displays a dialog where you can edit certain items related to that F&I product. The dialog contains different fields depending on the product selected. Click Save Changes when you are done. For example, the Edit Gap dialog appears if you decide to edit the Gap product:

Edit F&I Product
5. When you have finished editing F&I product options, click the Deliver Deal button at the bottom of the Create a Menu dialog.
6. The Deal Details dialog opens where you can make several selections:
| Item | Description |
| Monthly Payment | The system-generated monthly payment is selected by default. If you need to adjust the payment, select Other Monthly Payment and enter the new amount. |
| Amount Financed | The system-generated amount financed is selected by default. If you need to adjust this amount, select Other Amount Financed and enter the new amount. |
| Cancel | Click this button to cancel your changes and return to the previous dialog. |
| Continue | This moves your deal to the Recent/Unpaid Deals left navigation menu. You are ready to finalize the deal at this point. For more information, see “Finalizing Deals”. |

Adding a Limited Warranty to a Deal
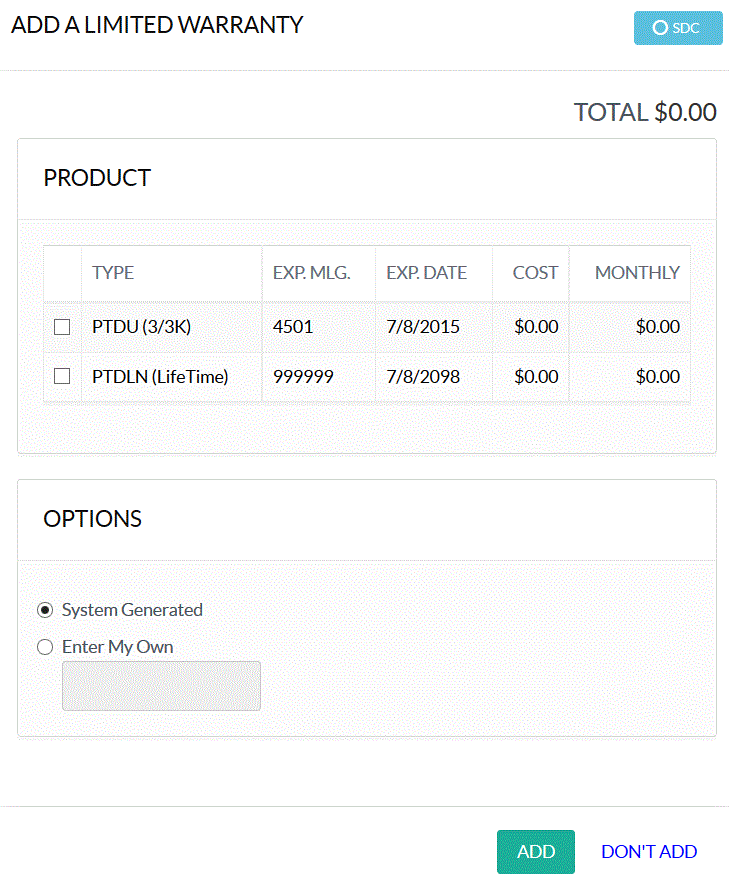
After clicking the Continue button at the bottom of the Deal Details dialog, the Add a Limited Warranty dialog appears.
1. In the Product panel, add a limited warranty to the deal by selecting the check box next to the desired limited warranty product. For example, this dialog contains two limited warranty products:
- PTDU (3/3K)
- PTDLN (LifeTime)
2. In the Options panel, you have two contract number options:
- System Generated – CGW automatically generates a contract number for the limited warranty.
- Enter My Own – Enter your own contract number for the limited warranty.

Add a Limited Warranty Dialog
3. After selecting your limited warranty product, click the Add button at the bottom of the dialog. CGW displays the final customer paperwork where you can view the limited warranty details and print out paperwork for your customer.

Final Paperwork
Clicking the Don't Add Button
Click the Don’t Add button in the Add a Limited Warranty dialog if you do not want to add a limited warranty to the vehicle.
You will receive this warning message:

Click Continue to view and print the final paperwork for your customer:

